ML Challenge: Implementing Pix2Code In Pytorch
In this project I am going to implement the model described in pix2code paper by Tony Beltramelli.
There are two main objectives for doing this.
- Getting comfortable using pytroch.
- Learn how pix2code works and have a working implementation for future projects.
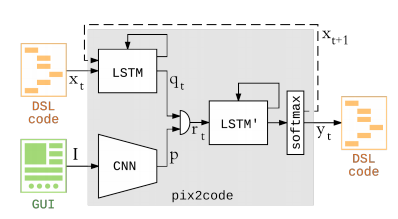
Architecture
The architecture is based on models used in image captioning. The model can be divided into three main parts.
- Image Encoder: A CNN for encoding input images of the desired UI.
- Context Encoder: A LSTM network for encoding context of previously generated code.
- Decoder: A LSTM network that takes the output from both of the previous models and generate the next word in the code.
Differences from the original implementation.
- The model was made focusing only on the web data.
- Use of RNN layers instead of LSTM layers.
- Model lacks dropout.
- Context length of the training data is different.
- Only greedy method is implemented for sampling.
Implementation
Creating Dataset
The original dataset released with pix2code is divided into android, ios and web data. In this implementation my focus was just on the web dataset. I started by copying all the web data into the dataset/unprocessed folder. Then I used a simple python script I wrote in the build_data.py file to split the data into dataset/training and dataset/evaluation set. If you clone my repo, you don’t need to do this step again.
Loading Data For Training
Getting this right took most of my time. The loading of data is handled by Vocabulary and UIDataset class present in the util.py file. The Vocabulary class with the help from voc.pkl file is used to convert tokens present in the DSL language to vector representations and vice versa.
The UIDataset class is an subclass of the pytorch dataset class. This creates a generator that return one sample of image, context and the prediction tensor pair from the dataset.
Creating The Model
The model consists of the three sub models as described above. They are stored in the model.py file.
ImageEncoder
class ImageEncoder(nn.Module):

    def __init__(self):
        super(ImageEncoder, self).__init__()
        self.conv1 = nn.Conv2d(3, 32, 3)
        self.conv2 = nn.Conv2d(32, 32, 3)
        self.conv3 = nn.Conv2d(32, 64, 3)
        self.conv4 = nn.Conv2d(64, 64, 3)
        self.conv5 = nn.Conv2d(64, 128, 3)
        self.conv6 = nn.Conv2d(128, 128, 3)
        self.fc1 = nn.Linear(in_features=128*28*28, out_features=1024)
        self.fc2 = nn.Linear(in_features=1024, out_features=1024)

    def forward(self, x):
        # x -> [-1, 3, 256, 256]

        x = F.relu(self.conv1(x))
        # x -> [-1, 32, 254, 254]
        x = F.relu(self.conv2(x))
        # x -> [-1, 32, 252, 252]
        x = F.max_pool2d(x, 2)
        # x -> [-1, 32, 126, 126]

        x = F.relu(self.conv3(x))
        # x -> [-1, 64, 124, 124]
        x = F.relu(self.conv4(x))
        # x -> [-1, 64, 122, 122]
        x = F.max_pool2d(x, 2)
        # x -> [-1, 64, 61, 61]

        x = F.relu(self.conv5(x))
        # x -> [-1, 128, 59, 59]
        x = F.relu(self.conv6(x))
        # x -> [-1, 128, 57, 57]
        x = F.max_pool2d(x, 2)
        # x -> [-1, 128, 28, 28]

        x = x.view(-1, 128*28*28)
        x = F.relu(self.fc1(x))
        x = F.relu(self.fc2(x))
        return x
ContextEncoder
class ContextEncoder(nn.Module):

    def __init__(self):
        super(ContextEncoder, self).__init__()
        self.rnn = nn.RNN(input_size=19, hidden_size=128, num_layers=2, batch_first=True)

    def forward(self, x, h=None):
        # x -> [-1, seq_size, 19], h -> [num_layer=2,-1, 128]

        if not h:
            h = torch.zeros((2, x.size(0), 128)).cuda()

        x, _ = self.rnn(x, h)
        return x
Decoder
class Decoder(nn.Module):

    def __init__(self):
        super(Decoder, self).__init__()
        self.rnn = nn.RNN(input_size=1024+128, hidden_size=512, num_layers=2, batch_first=True)
        self.l1 = nn.Linear(512, 19)

    def forward(self, image_feature, context_feature, on_cuda = False, h = None):
        # image_feature -> [-1, 1024], context_feature -> [-1, seq_size=48, 128], h -> [num_layer=2, -1, 512]
        image_feature = image_feature.unsqueeze(1)
        # image_feature -> [-1, 1, 1024]
        image_feature = image_feature.repeat(1, context_feature.size(1), 1)
        # image_feature -> [-1, seq_size, 1024]
        x = torch.cat((image_feature, context_feature), 2)
        # x -> [-1, seq_size=48, 1024+128]

        if not h:
            h = torch.zeros((2, x.size(0), 512)).cuda()

        x, _ = self.rnn(x, h)
        x = self.l1(x)
        # x = F.softmax(x, dim=1)
        return x
Pix2Code
Combining them we get.
class Pix2Code(nn.Module):

    def __init__(self):
        super(Pix2Code, self).__init__()
        self.image_encoder = ImageEncoder()
        self.context_encoder = ContextEncoder()
        self.decoder = Decoder()

    def forward(self, image, context):
        image_feature = self.image_encoder(image)
        context_feature = self.context_encoder(context)
        output = self.decoder(image_feature, context_feature)
        return output
Training
Training is done in the training loop located under the Training section of pix2code.ipynb notebook
for epoch in range(10):
    net.zero_grad()
    for j, data in enumerate(dataset):
        image, context, prediction = data
        image = image.unsqueeze(0).cuda()
        context = context.unsqueeze(0).cuda()
        prediction = prediction.cuda()
        output = net(image, context)
        output = output.squeeze(0)
        prediction = torch.argmax(prediction, 1)
        loss = criterion(output, prediction)
        loss.backward()
        if j%10 == 0:
            optimizer.step()
            print('Loss: {}, Epoch: {}'.format(loss.data, epoch))
            net.zero_grad()
This is not the most efficient implementation and there are a few things here that I need to do more research on.
Testing
To test the model a random image is taken from the evaluation set and its code is generated using the code written under the Testing section in the pix2code.ipynb. Then compiler/web-compiler.py file is used to compile the generated code into HTML. The HTML file generated can now be opened in a web browser and you can compare it to the original image.
image = image.cuda()
ct = []
ct.append(vocab.to_vec(' '))
ct.append(vocab.to_vec('<START>'))
output = ''
for i in range(200):
    context = torch.tensor(ct).unsqueeze(0).float().cuda()
    index = torch.argmax(net(image, context), 2).squeeze()[-1:].squeeze()
    v = vocab.to_vocab(int(index))
    if v == '<END>':
        break
    output += v
    ct.append(vocab.to_vec(v))

with open('./compiler/output.gui', 'w') as f:
    f.write(output)

print(output)
Here is a link to my complete implementation.